Hello and happy Thursday! Isn't he a cutie? I babysit this lil guy and today I just could not resist getting the camera out and snapping a few photos of him for his mama :)
Go here to see a few more!
All photos taken by Kristen (blog author) unless otherwise stated. Do not copy/save or print without permission. Thank you!
{A blog journaling my life as a stay-at-home wife and mother as well as my love for photography and interior design.}
Thursday, November 10, 2011
Tuesday, November 8, 2011
3 Ingredient Chocolate Muffins
Ever since I made these, I have wanted to try it with chocolate cake mix. So when my mom came to visit this last time, she brought goodies (like she always does) which included a chocolate cake mix and a can of pumpkin. I decided last night (when I was having sweet cravings) that today I was going to make muffins with it and add some white chocolate chips we had leftover from some cookies we made. They turned out super yummy! And, they are a healthier choice than regular cake since they have pumpkin in place of the oil and other ingredients. (Pumpkin is a great superfood!) Also, I should note that I couldn't actually taste the pumpkin in these muffins. But, the pumpkin did give them a thicker, moist consistency perfect for muffins and also made them healthier :)
Here's all you need....
(like my slightly damaged clearance cake mix box? ;) My mom is a bargain hunter, that's where I got it from!
Combine the pumpkin and cake mix, then add as many white choc. chips as you like! The batter will be thick. I actually added a little milk this time so that the batter would be a little easier to work with.
Just ignore my ugly old muffin pan. It's served me well ;)
Ahhh, yummy goodness :) Great with a glass of milk!
All photos taken by Kristen (blog author) unless otherwise stated. Do not copy/save or print without permission. Thank you!
Sunday, October 23, 2011
Vintage Fall Mantle
Well, this is my first ever 'mantle post.'
We don't have a fireplace and I have always been jealous of all the bloggers with their mantles decorated for the seasons ;) Especially at Christmas, I always long for a mantle to decorate for the holidays. I'm not so much interested in the actual fireplace since we have a 2 year old and one on the way (although I'm sure it would be nice to cuddle up by the fire once in a while when the kids are in bed...) Anyway, I decided that since I gained some new wall space with the addition that I would add a mantle to the room. The main purpose of our addition is a 'playroom' for overflow of toys and other kid/baby 'things' that take up a lot of space but I didn't just want the room to be a toy pit. I wanted it to have some style at least especially since it opens to the living room and is also in direct view of the kitchen. So, I thought the room would be a perfect place to put my much desired faux fireplace or mantle. Well, I searched and searched on craigslist and was getting nowhere. I had a pretty strict budget for my mantle and none of what I was seeing was in my price range. Finally, I decided to call around some local thrift and antique stores and I finally found one!
It was perfect! ...or so I thought... You see, the mantle is very distressed and old. It is painted white and it is hard to tell in these photos but the paint is all crackled and coming off.
It looks very charming and has tons of character which is why I fell in love with it!
But after we got it home, I realized that the shabby style of the mantle wasn't really the style of the rest of our home. I'm not really sure how to describe our style but I have always considered it to be more of a sophisticated casual. I like to keep it nice but not too nice. I want it to be comfortable but stylish. Anyway, our home is casual yes but shabby and rustic...not so much. SO as much as I adore the finish on this old mantle, I think I will be painting it. It will still be cute and old but not as shabby. Although I couldn't resist decorating it with a little vintage vignette before I paint it :) It definitely has character....but maybe just a little too much for our home.
Anyhoo, back to my Fall mantle...
All photos taken by Kristen (blog author) unless otherwise stated. Do not copy/save or print without permission. Thank you!
We don't have a fireplace and I have always been jealous of all the bloggers with their mantles decorated for the seasons ;) Especially at Christmas, I always long for a mantle to decorate for the holidays. I'm not so much interested in the actual fireplace since we have a 2 year old and one on the way (although I'm sure it would be nice to cuddle up by the fire once in a while when the kids are in bed...) Anyway, I decided that since I gained some new wall space with the addition that I would add a mantle to the room. The main purpose of our addition is a 'playroom' for overflow of toys and other kid/baby 'things' that take up a lot of space but I didn't just want the room to be a toy pit. I wanted it to have some style at least especially since it opens to the living room and is also in direct view of the kitchen. So, I thought the room would be a perfect place to put my much desired faux fireplace or mantle. Well, I searched and searched on craigslist and was getting nowhere. I had a pretty strict budget for my mantle and none of what I was seeing was in my price range. Finally, I decided to call around some local thrift and antique stores and I finally found one!
It was perfect! ...or so I thought... You see, the mantle is very distressed and old. It is painted white and it is hard to tell in these photos but the paint is all crackled and coming off.
It looks very charming and has tons of character which is why I fell in love with it!
But after we got it home, I realized that the shabby style of the mantle wasn't really the style of the rest of our home. I'm not really sure how to describe our style but I have always considered it to be more of a sophisticated casual. I like to keep it nice but not too nice. I want it to be comfortable but stylish. Anyway, our home is casual yes but shabby and rustic...not so much. SO as much as I adore the finish on this old mantle, I think I will be painting it. It will still be cute and old but not as shabby. Although I couldn't resist decorating it with a little vintage vignette before I paint it :) It definitely has character....but maybe just a little too much for our home.
Anyhoo, back to my Fall mantle...
I 'borrowed' the old window I got for Ava's room and hung my homemade acorn wreath on it.
Wrapped it in some leftover burlap (don't ya just love burlap??)
Ahhhh, I love the stripes we hubby painted in there. They look so great, can't wait to see how it looks when the floors aren't concrete....
So, our room is almost finished! We are having the carpet installed this week! Then I can 'move in.' I'm excited to show off the room when we are done. I am loving how it's coming together so far! Remember my Ballard Knock-Off Drapes? They will be in there (along with some matching throw pillows, maybe???) Ahh, can't wait!All photos taken by Kristen (blog author) unless otherwise stated. Do not copy/save or print without permission. Thank you!
Tuesday, October 11, 2011
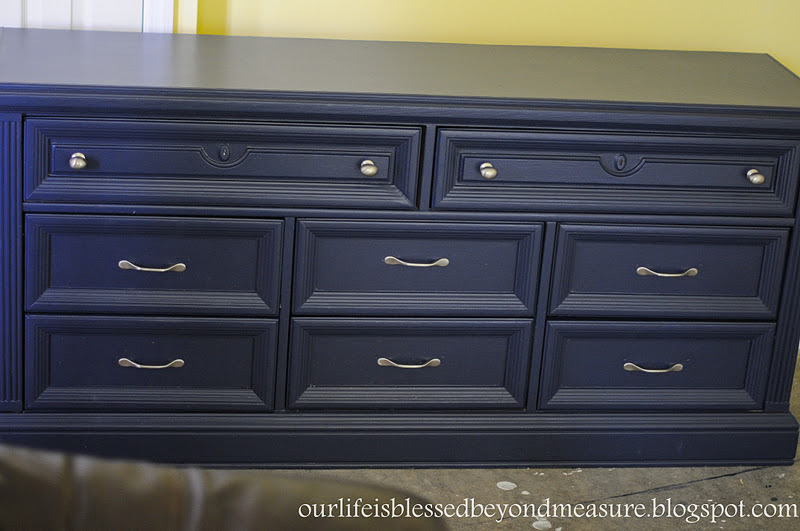
Hayden's $25 Craigslist Dresser: From Drab to Nautical Fab!
Finally!!!! I got this dresser months and months ago and it's finally finished! I found this ugly old dresser on Craigslist and got it for a steal at just $25!
Of course, it needed a lot of help....it had about 4 or 5 different kids of hardware on it and the top had some water damage on the right corner. We worked hard on it and put a new top on it....
Sorry for the not-so-great after pics....I had to take them in our partially-finished bonus room and it wasn't working out too well....
(the color variation in this corner of the photo is just from my jacked-up image, it does not look like this in real life!)
All photos taken by Kristen (blog author) unless otherwise stated. Do not copy/save or print without permission. Thank you!
Of course, it needed a lot of help....it had about 4 or 5 different kids of hardware on it and the top had some water damage on the right corner. We worked hard on it and put a new top on it....
We added some trim to cover the edges...
used some wood filler and did some sanding and priming. I didn't get a pic of the dresser primed but I used the grey gripper primer.
Then, we painted it a navy color in satin. It was very hard to find the right navy color. I wanted something dark but not purple-ish or so dark that it looked black. I started off with one color in a different brand of paint and a semi-gloss finish. After several coats, I decided I hated the color and the sheen. I chose a different navy and finish and used Valspar hi-def paint (our new FAV paint, we will never use another paint!!!) The color is called Victory Blue and it's an Olympic color but we got it in the Valspar (literally THE only true one-coat paint I have ever used, it covers amazingly!! Have you seen the commercial where they used red paint to cover the black and white stripes? That's this paint!!) Anyhoo, we painted one coat of that color in satin and added the hardware. We had to drill new holes for the six smaller drawers so that took a little time. I added some brushed nickel hardware, I thought it went great with the navy as well as the nautical decor I am doing in Hayden's 'big boy room.'
Anyway, here is the finished product! I'm pretty happy with it myself!
Sorry for the not-so-great after pics....I had to take them in our partially-finished bonus room and it wasn't working out too well....
(the color variation in this corner of the photo is just from my jacked-up image, it does not look like this in real life!)
So, I sort of lost track of how much I spent total on everything but I would bet that I spent around $75 including the paint, primer and hardware (and the original $25 for the dresser.) For less than $100 I got a great (solid, real wood) dresser for Hayden's new room! Beats this smaller (and, in my opinion, less cute) dresser from Land of Nod for $799!
(source: Land of Nod)
Here is a before & after :)
I can't wait to see how it looks in his room once we get everything done in there (which, who knows how long that will be!)
p.s. I'm linking up to Thrifty Decor Chick's Before and After Party!
All photos taken by Kristen (blog author) unless otherwise stated. Do not copy/save or print without permission. Thank you!
Wednesday, September 28, 2011
My (frugal!) Fall Front Porch
Welcome to our front porch all decorated for the Fall season! I am sad to say, this is about the only decorating for Fall that I have done this year since we have projects going on around the house (including a room addition that is nearing completion....I hope!!) I can't wait to show it off to you guys when it's finished. I'm calling it the 'playroom' but it will be a mulitpurpose room for the kids to play, watch movies, extra seating/elbow room for when guests are over, etc...
Anyway, enough of that! On to the front porch :)
All photos taken by Kristen (blog author) unless otherwise stated. Do not copy/save or print without permission. Thank you!
Anyway, enough of that! On to the front porch :)
I did something similar to last year with putting pumpkins in my planters. I had high hopes of making these cute pumpkin topiaries I saw on Pinterest, but alas, it would have been a little too pricey to make them with buying all the pumpkins needed to make them. So, instead I found these fun giant gourds for $6 and then just placed a small pie pumpkin on top. They were cheap too, I think $4 each. The garland is leftover from last year so I consider that 'free.' ;)
The wreaths on the windows are from last year as well. I just hing them right back up for this year!
So, there you have it! Nothing spectacular, I would have loved to do so much more but this year we are putting all of our money towards projects (and baby rooms ;)
p.s. I'm linking up to Rhoda's Fall Door Party!
All photos taken by Kristen (blog author) unless otherwise stated. Do not copy/save or print without permission. Thank you!
Friday, September 23, 2011
"Naptime"
Some days I have difficulty getting my 2 year old to take a nap...
All photos taken by Kristen (blog author) unless otherwise stated. Do not copy/save or print without permission. Thank you!
Some days he wants to play instead...
Today was one of those days...
"I want Jessie to take a picture."
And even though he is rotten as can be...
He still melts my heart!
All photos taken by Kristen (blog author) unless otherwise stated. Do not copy/save or print without permission. Thank you!
Tuesday, September 13, 2011
Tennessee Valley Fair 2011
Last night we took Hayden to the fair for some family fun. He was excited :)
All photos taken by Kristen (blog author) unless otherwise stated. Do not copy/save or print without permission. Thank you!
"come on, guys!"
We went later in the evening after Jeff got home so it was dark while we were there...not the best conditions for picture-taking but I wasn't gonna let that stop me! :)
I had such high hopes of my little man getting to ride tons of kiddie rides...
I even got him a wristband so he could ride to his hearts' content...
But alas, my "little" man did not meet the height requirements for more than a few of the rides :( I managed to sneak him on a couple that he wasn't tall enough for but I was still heartbroken that he couldn't ride them all.
So, we did other things. Like get a 'face' painting on the arm. He LOVED it.
And feeding the animals.
He is such an animal lover. He would tell all the aminals "come here!"
We skipped the farris wheel but I had fun watching it.
We ended the night with a fried oreo and lemonade snack, YUM!!!
All photos taken by Kristen (blog author) unless otherwise stated. Do not copy/save or print without permission. Thank you!
Subscribe to:
Posts (Atom)