Monday, July 1, 2013

Living Room Makeover

Well, I am finally posting about our living room makeover (after over a year!) Better late than never, right? ;)

We painted and put up the board and batten wainscoting over a year ago but it's taken me a while to slowly change out everything else.  It's a lot different than before and I love the fresh, new colors!

Here is a side-by-side to show you the before and after!


I guess the most obvious change is that we opened up the wall where the garage entrance was.  We added the bonus/play room when I was pregnant with Ava Kate and we were unable to sell and needed more space.  This also opened up the living room a bit which is a lot better than having that door staring you in the face!  Anyway, we added the wainscoting, painted, changed out the light fixture (I fell in love when I saw this lantern on Thrifty Décor Chick's blog,) hung the t.v. and got a taller console, got rid of the giant leather ottoman and replaced it with our old coffee table that we had when we were first married, got a new rug, curtains, pillows, etc....  It's crazy to see how much my decorating style has changed in the 5 years that we have lived here!
Here is a before and after from another angle.


 I wish I had a before pic of this wall.  I had a giant, red, metal star in the middle with a few wooden signs with sayings on them on either side. I love the look of this 'gallery wall' now!  (Still working on filling the frames...)


The entry way got a change as well.  I found this piece at a local resale shop.  It's actually an old radio/record player!
 
 
 My dad let me borrow his old, film Minolta to play around with and I love having it....can't say that I've used it for the intended purpose but it looks so cute in this wire basket I bought at Marshals!  ;)
 

On the end table is another wire basket, I just love them!

 I wish these were my hydrangeas but mine decided not to bloom this year, so I got these from Trader Joe's (my fav place to get fresh flowers!)
 
Thank you for checking out our living room makeover, we are enjoying the new, brighter look!
 

All photos taken by Kristen (blog author) unless otherwise stated. Do not copy/save or print without permission. Thank you!

Tuesday, June 11, 2013

Hayden's Angry Birds Star Wars Party

My big boy turned 4 last month and I'm finally getting around to posting about his party!  We did an Angry Birds Star Wars party since that is something he's been a bit obsessed with lately. 


I kept things pretty simple for this party (maybe I'm still recovering from baby girl's party a few months ago, ha!)  Anyway, I think he enjoyed it just as much.

I decided to make the cake myself to save some money.  It definitely was not for the faint of heart up-close!!  Far from perfect, but edible!  I ordered the fondant characters from Etsy and was really pleased with how detailed and cute they were!
 

I bought some pre-made fondant and we (mainly Jeff) cut out the number 4 and stars.  He also rolled a million little balls for the bottom.  I tried a new buttercream recipe that called for nutella and it was delicious!!  It was basically your typical buttercream recipe with a cup of nutella but I only used about 1/2 and that was the perfect amount. 

I also had cupcakes (store bought) that I added little AB Star Wars figures on top of for favors.

Can't believe he is 4 already!


All photos taken by Kristen (blog author) unless otherwise stated. Do not copy/save or print without permission. Thank you!

Thursday, May 16, 2013

Hayden's Nautical "Big Boy Room"

Well, Hayden finally got his big boy room (mostly) finished just in time for his 4th birthday! 
 

I have this thing for nautical anything, I just love it.  So I knew a long time ago that I wanted to re-do Hayden's room in a nautical style.  I tried not to get too carried away with the 'theme' but I'm not sure if I did a very good job of that or not ;)  I also tried to keep it little-boyish.  He is only 4 and I didn't want his room to look like a gallery or living room so I tried to incorporate little boy things as much as I could.  I'd say his room is like 98% done.  I would like to get some rectangle wire baskets for the top of his dresser and probably something to put in the red one on the top right shelf.  But, who knows how long it will take me to get those things.  I have had trouble finding wire baskets or if I do, they are outrageous. 

Anyway, the built-ins were made by hand by my wonderful hubby!  The window seat doubles as a toy box for added storage.  I love the built-ins and they turned out exactly how I wanted!   


His room is very small, so we had to make the most of every inch!  We could only fit a twin bed in there and I decided to put it up agains the wall and build it in to the shelving in order to save space.
The stripes on the bed wall are the same navy as the dresser in his room. We only striped that one wall because I thought it might be overwhelming in that small room to do the other walls.

On the opposite wall is his dresser, which you may remember was a craigslist find I got for $25 and Jeff and I refinished it.  I think his dresser is my fav piece of furniture in the whole house!
 

The bedding is a mixture of Pottery Barn Kids and a Tommy Hilfiger comforter I got at a consigment sale.  I adore those lobster sheets from PBK!  Definitely a splurge but I couldn't resist.  The rugby duvet cover is also from PBK but Target has almost exactly the same one for cheap but I couldn't find a twin size one online or in stores.  Would have loved to snag that look-a-like!
 
 
I decorated the shelves with things I've collected over the past couple years and also a few new things.  I wanted it to look age-appropriate but still stylish so I used a lot of his books, some blocks, a piggy bank, a few nautical knick-knacks and some storage bins for toys.

I need something for that red, wire basket...


Love these whale bookends, they are perfect for this little room :)


For the window seat (I totally wanted one as a kid) I covered a piece of foam with a bed sheet I cut and hot glued on ;)  The crab pillow on the left was made by a friend of mine who also made the fabric banner above his bed.  They both turned out so cute!! 

The wall treatment is 1 1/2 inch aspen hung horizontally and painted the same color as the wall.  While we were on vacation last year at the beach, we saw that wall treatment at our favorite home store there and I knew I wanted to re-create it in Hayden's room.  I love how it looks.  Of course the beadboard ceiling is leftover from the nursery:) Still one of my fav parts of the room.  Gives it so much character!!

I spent lots of time planning the style and decor of this room but my hubby worked even harder building everything and painting.  I tried to help paint but I leave the building up to him!  It turned out great and I am so proud that Jeff is so handy!  Our house would be in sad shape if it wasn't for all the custom touches he's done in there! 
 
So, we finally finished Hayden's room.  I hope he loves it.  We enjoyed creating it for him!


I'm linking up to Savvy Southern Style!


All photos taken by Kristen (blog author) unless otherwise stated. Do not copy/save or print without permission. Thank you!

Tuesday, April 16, 2013

Consignment Shopping Love

I've been meaning to post about my love of children's consignment sales for a while now, but since I've not been the best blogger lately....Anyway, better late than never ;) 

 
Last week was my favorite local childrens consigment event.  It's a huge sale that happens twice a year.  I very much look forward to it and joke to my friends that it's like Christmas for me.  And it really is, I get way too excited :p 

If you're a mom, you know that shopping for a whole new wardrobe for your child/children every season can get very expensive!  I love to dress my kids in nice brands and to some it may seem like I spend a lot on their clothes but I don't.  My secret is consigmnent shopping :)  I know it may not be for everyone and it can be a lot of work (especially if you consign and work the sales) but it's worth it to me.  So if you don't mind buying gently used clothing and a little bit of extra effort, it can save you lots of money (and everyone loves that, right?!) And I will say that I don't buy all of their clothes/shoes at these sales but definitely the majority.  I still buy some new items for each of them every season but I shop sales/clearance racks.  The only time I pay full price for their clothes is if it's for a special occasion or something that I just can't resist but that's not very often. 

I had quite a haul this past sale but I won't list everything I bought.  Basically I got most of the clothes and shoes they will need for the spring/summer season. Here are some of my fav or best deals....

Wooden Eddie Bauer baby-seat-that-attaches-to-chair-thingy: $10

Pottery Barn Kids chalkboard/easel: $15 (I was pretty excited about this one!)
 
 
Couldn't resist this little plush rocker for Ava Kate: $20 (sell for about $70 new)

Sperrys in the box (look brand new) for $10!

Hayden saw me taking photos of the shoes and said he wanted to pose with them....crazy kid.

RL polo shirts for $4-$6 each.

Leapster games $4-$5 each

Batman scooter (he requested a scooter when I told him I was going to the sale) :$7
 
Not really an 'amazing deal' but just a cute find.  Bow tree for baby girl's bows. $3
 
Two of my fav dresses (I picked up lots for her!) These are from Children's Place and I think they were both $6 each.
 
 
And these two little Childrens Place halter tops were sold together. One of them still had the "2 for $15" tag and I got them for $1!!! 
 
I got so many other things but I just wanted to give some examples of deals that can be found! 


My kiddos as I was photographing a few items for this post...  Sillies.


Most cities should have these seasonal consignment events twice a year.  They will have a spring/summer sale and a fall/winter sale.  Do a google search for your area if you aren't sure when/where a sale is. 

Some tips if you are new to consignment shopping, want to try it, or have been to one of the huge sales before and gotten discouraged.

1) WORK the sale so you can shop the early (private) sale. These giant sales can get crazy when open to the public and things are often picked over quickly so you can avoid all of that by shopping the private sale for consigners/workers.  They need lots of volunteers to run these sales and you can get lots of benefits (including passes for the private sale and at some sales passes to avoid long lines at checkout) if you work.     

2) Consign.  If you sell your kids' stuff from last year, you can put that money towards purchasing new items!  I don't save/store my kids' clothes even though we will probably have another kid.  I don't have the storage space and also, I want to be able to 'trade' it for new things I need for them.  

3) Plan to spend lots of time tagging, dropping off, working, shopping, picking up unsold items (if you've chosen not to have them donated.)  This might not seem fun but it's something you've got to be willing to do if you want to take full advantage of the sale.  It's worth all the work to me.  And I actually enjoy most of it (although I do hate tagging.)  I love the whole expericence but maybe I'm crazy.  I know it's not for everyone and that's ok :)  I, however, think it's great and love it.   

4) Bring something to put your items in.  These sales aren't Wal*Mart and they don't provide shopping carts so you'll have to bring something to haul all your stuff in.  Some use strollers, laundry baskets, hampers with wheels, etc...  The best one I have seen is the wonder wheeler beach cart.  They have lots of room and of course wheels!  I hope I can get my hands on one before the next sale, they are awesome. 

5) Make a list.  I always try to make a list of specific things I want to get at the sale but I would recommend (if you were super organized, unlike myself) making a list of everything you want to get.  That way, you won't get home and think "I should have gotten more shorts and pj's" or realize you forgot some things.  I always get so into my shopping and looking at things that I lose track of what I have/don't have.  It's good to have a list.

6) Set a budget.  This is also something I'm not so great at.  I'd recomment maybe bringing a calculator (or using one on your phone) to keep track of your total.  I always get nervous when I'm done shopping and just hope that I didn't spend some crazy amount.  I could avoid that by just setting a budget and keeping track of what I buy.  A budget will also help you not make impulse buys (which I am terrible at!)

If you have ideas you'd like to add, please comment below!  I know there are probably lots of things I am forgetting or haven't thought of :)  Just wanted to share some things I have learned in the 3.5 years I have been shopping these mega sales.  Hope that some will find it helpful!  Happy shopping!


All photos taken by Kristen (blog author) unless otherwise stated. Do not copy/save or print without permission. Thank you!

Monday, February 25, 2013

One Year in a Flash! (Ava Kate's first birthday party)

Whew!  We survived the 'big day!'  Just wanted to share a million few photos from Ava Kate's birthday party this weekend!

First, I will explain a bit about the theme (One Year in a Flash) and how I decided on it. 
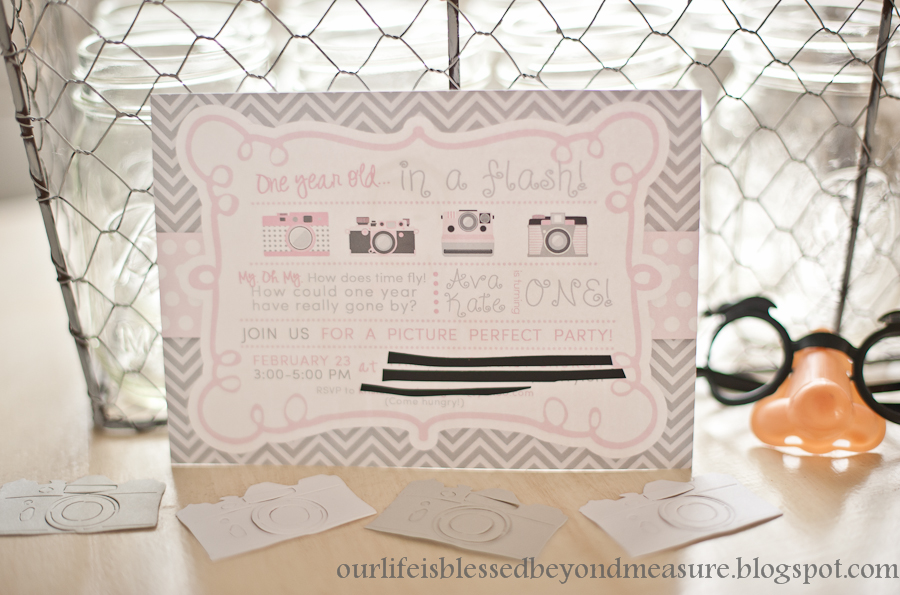
For months, I was scouring the internet (mainly Pinterest) looking for the perfect 'theme' for my girl's first birthday party.  I knew I wanted it to be girly but I also wanted something 'different,' I just didn't know what exactly...  One day, I happened upon this party and immediately loved the idea!  But I knew I wanted to 'girly' it up and do things differently but I liked the theme itself.  I thought it fit perfectly since I love to take pictures and I really do feel like this past year has gone by in a flash.  So, anyway, I emailed my blogger friend Ashley about designing her invitation and we got started brainstorming about colors, designs, etc...  I am in love with how the invitation turned out and it was exactly what I wanted!!  She did a wonderful job!


Visit Ashley's Etsy shop, Paper Dime Design to see more of her adorable creations!  On the back of the invitation, I included a photo of her so people could (if they wanted to) frame the 5x7 picture instead of tossing the invite ;)

So, now I will show you lots and lots of pictures from the party and kind of explain things as I go, I suppose!

There was so much that I wanted to do and didn't or did differently mainly because I am a procrastinator...  But for one, I wanted to use a piece of furniture we have for the cake table.  It wasn't going to be big enough for the cake, candy jars, cameras, flowers, etc..so I had to use a regular folding table.  Kinda sad I didn't get to go through with my original plan but oh well. 
I used my dad's vintage minolta camera and an old camera my grandpa gave me as props.  I love how they looked on the cake table with the flowers and a framed copy of her invite.

The cake was inspired by a cake I saw online that used filmstrips as a border but it had a giant, dslr camera on top so we changed a few things and I LOVE how it turned out!!  I created the filmstrips in photoshop and my friend Adrienne made the cake.  It turned out perfect!! 

(photo by Taryn Yager)

I wanted to include a photo banner from her first year so the night before her party, my sweet hubby cut out all the paper frames from cardstock and I created this to go above her cake table.  Jeff also painted the frame pink so it would coordinate :)


I love this poster also created by Ashley, you can order one for yourself in her etsy shop!!  We printed it at our local Office Depot and I mounted it on a foam board I got at the Dollar Tree.  Super easy!  I also ordered paper straws, cameras, lips and mustaches to create cute little props for our photo booth.  The photofetti was adorable and fit perfectly with the theme.  The vintage camera cutouts were purchased from this lovely etsy seller and the lips and mustaches were from here.

 I made her onesie after I saw one on Pinterest that was selling on Etsy for $20.  I knew I could make it for cheap but it ended up being a little time-consuming and possibly would have been worth it to just pay the $20 ;)  But I liked the idea of it being made by me for memories.  Her headband was made by my friend Jacquie.  Check out her cute Etsy shop!

(photos by Taryn Yager)

My wonderfully talented and thoughtful bestie, Taryn, brought her camera and took lots of pictures for me at the party.  She did this even though she brought her 3 year old and is 27 weeks pregnant.  I am forever grateful to her for this wonderful gift because I barely touched my camera once guests started arriving!  She took these beautiful pictures....  If you'd like to visit her facebook page, here's a linky :) 
more photos by Taryn.  We had a photobooth and I set up my dad's camera on a tripod with a remote so people could snap their own photos.  It was fun!  (this was another thing I dropped the ball on, I wanted to make a really cute background for it but didn't...instead my mom was trying to put up streamers last minute but people still had fun with it and that's all that matters, I suppose ;)

Here she is smashing into her cake and loving every minute of it!

(photos by Taryn Yager)
Here is big brother having fun with party favors ;)
(photos by Taryn Yager)

The favors said "thank you for a picture-perfect birthday" and it was. 
(photos by Taryn Yager)


We had an inflatable for the kids and served Taco soup and pb&j for the little ones.  We had lots of help from my parents who helped out so much with setting up, keeping the food table stocked and loading up the cars after. We also had some friends and my sister-in-law stay to help us after and we are SO grateful.  I hate to think of how much work we would have had without all the help.  It was a long and stressful but fun day and we had a great time celebrating with our little girl!  
All photos taken by Kristen (blog author) unless otherwise stated. Do not copy/save or print without permission. Thank you!